Apple trees are beloved for their sweet, crisp fruit, and their cultivation has been a staple of home gardening for centuries. While growing apples from seed can be a lengthy and unpredictable process, propagating them through cuttings offers a more efficient and reliable way to produce fruit-bearing trees. This guide will take you through the steps to grow apples from cuttings, offering detailed instructions, best practices, and tips for success.
Why Grow Apples from Cuttings?
Growing apple trees from cuttings is a popular propagation method because it allows you to replicate the parent tree, ensuring that you maintain the same quality and characteristics of the original apple variety. Unlike growing from seed, which can result in genetic variation and inconsistent fruit quality, cuttings will produce a clone of the parent tree.
Here are a few key benefits of growing apples from cuttings:
- Faster fruit production: Seed-grown apple trees may take 7-10 years to bear fruit, whereas apple trees grown from cuttings can start producing fruit in 2-4 years.
- Cloning of the parent tree: You’ll know exactly what kind of apples you’ll get since the cutting is a direct genetic copy.
- Cost-effective: Growing from cuttings is inexpensive and doesn’t require purchasing grafted trees.
When to Take Apple Cuttings
The best time to take apple cuttings is during the late fall or early winter when the tree is dormant, and the wood is hard but still healthy. This dormant period is ideal because the cutting is less likely to dry out or suffer from stress.
There are two main types of cuttings you can take:
- Hardwood Cuttings: Taken from mature, dormant wood in the fall or winter. These are generally more successful for apple trees.
- Softwood Cuttings: Taken from new growth in the spring or early summer. These can also work but are more prone to drying out or failing to root.
For beginners, hardwood cuttings are the easiest and most reliable option.
Step-by-Step Guide to Growing Apples from Cuttings
1. Gathering Your Materials
Before starting, gather the necessary tools and materials:
- Pruning shears or a sharp knife
- Rooting hormone (optional but recommended for increased success)
- Clean, sterilized potting containers (small pots or trays)
- Well-draining potting mix (preferably a mix of peat and perlite)
- Clear plastic bags or a propagation dome
- Spray bottle for misting
- A sharp pencil or stick for making holes in the soil
2. Selecting the Right Cutting
Choose a healthy, disease-free apple tree from which to take your cutting. Look for a branch that is about pencil-thick and at least one year old. The cutting should be around 6-8 inches long and have at least three to four buds along the stem.
- Hardwood Cutting: Ensure the wood is firm and doesn’t bend easily.
- Softwood Cutting: This should be taken from younger growth if you’re propagating in the spring.
3. Taking the Cutting
Using sharp, sterilized pruning shears or a knife, make a clean cut just below a node (the point where a leaf or bud attaches to the stem). The node is where new roots will likely emerge. Remove any leaves or buds from the lower half of the cutting to prevent moisture loss and rotting.
4. Preparing the Cutting for Rooting
Once you’ve taken your cutting, you’ll want to prepare it for planting:
- Wound the base: Lightly scrape off the bark on the bottom inch of the cutting to expose the cambium layer. This encourages root growth.
- Use Rooting Hormone: Although optional, dipping the wounded end of your cutting in a rooting hormone can significantly increase your chances of success. Rooting hormones contain natural growth stimulators that encourage quicker root development.
5. Planting the Cutting
Fill your pot or tray with a well-draining potting mix. Use a stick or pencil to make a hole in the soil, deep enough to bury at least half of the cutting, ensuring that two to three buds are still above the soil surface.
Place the cutting into the hole and gently firm the soil around it. Water lightly to settle the soil, but ensure it’s not overly saturated.
6. Creating the Right Environment for Rooting
Apple cuttings need a humid and stable environment to successfully root. Place a clear plastic bag over the container or use a propagation dome to create a mini-greenhouse effect, trapping moisture and maintaining a high humidity level. Make sure the plastic does not touch the cutting, as this could cause rotting. You can support the plastic with small stakes if necessary.
Position your cutting in an area where it will receive indirect sunlight. Avoid direct sun, as it can overheat and dry out the cutting before it roots. A temperature of around 60-70°F (15-21°C) is ideal for promoting root growth.
7. Caring for the Cutting During Rooting
Over the next few weeks, monitor the moisture level of the soil. Keep it lightly damp but never waterlogged, as excessive moisture can lead to rot. Mist the inside of the plastic bag or dome regularly to maintain humidity.
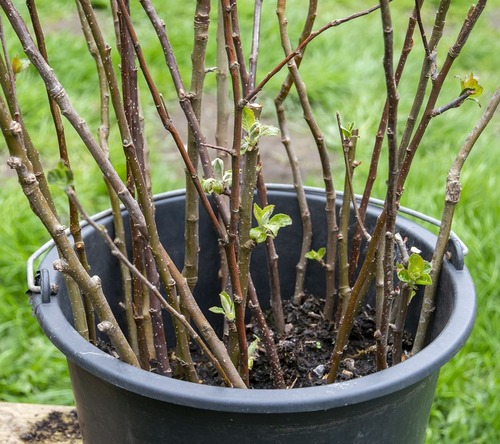
Rooting can take several weeks to a couple of months, so be patient. The first signs of success will be the development of new buds or leaves, indicating that the cutting has successfully rooted and is starting to grow.
8. Transplanting the Rooted Cutting
Once you see new growth, your cutting is ready to be transplanted into a larger container or directly into the ground. Follow these steps for successful transplanting:
- Harden off the cutting: Before transplanting outdoors, acclimate your new apple tree by gradually exposing it to outdoor conditions over the course of a week. Start by placing it outside for a few hours each day and gradually increase the time.
- Choose a Suitable Location: Apple trees need full sun and well-draining soil to thrive. Choose a spot with at least 6-8 hours of sunlight daily.
- Transplanting into the ground: Dig a hole twice as wide and just as deep as the root ball of your cutting. Place the tree into the hole, backfill with soil, and water thoroughly.
If you’re transplanting into a larger pot, ensure the new container has adequate drainage and space for the roots to grow.
Caring for Your New Apple Tree
Now that your cutting has rooted and been transplanted, proper care is crucial to ensure your apple tree grows strong and healthy.
1. Watering
Young apple trees need consistent moisture to establish strong roots. Water the tree deeply once or twice a week, depending on the climate and soil type. Avoid letting the soil dry out completely, especially during the first few months of growth.
2. Fertilizing
After the first growing season, you can begin feeding your apple tree with a balanced fertilizer or one formulated for fruit trees. Apply fertilizer in early spring and again in mid-summer to promote healthy growth and fruiting.
3. Pruning
Pruning is essential for shaping your apple tree and encouraging fruit production. In the first few years, focus on developing a strong central leader (main trunk) and remove any weak or crossing branches. Once your tree begins to fruit, annual pruning will help manage its size and improve air circulation.
4. Protecting from Pests and Diseases
Apple trees are susceptible to a variety of pests and diseases, including aphids, apple scab, and powdery mildew. Keep an eye out for any signs of trouble, and consider using organic sprays or companion planting to deter pests. Mulching around the base of the tree can help retain moisture and prevent weed growth, which can harbor pests.
Common Challenges When Growing Apples from Cuttings
While growing apples from cuttings is a rewarding experience, it does come with some potential challenges:
- Cutting Failures: Not all cuttings will root successfully. Make sure to take several cuttings to increase your chances.
- Root Rot: Overwatering or poor drainage can cause root rot. Always use well-draining soil and avoid waterlogged conditions.
- Pest Damage: Young trees are particularly vulnerable to pests like aphids, so regular monitoring is essential.




Leave A Comment